Case Report
A 62-year-old male patient reported to Department of Prostho-dontics, Goa Dental College and Hospital, Goa, India with the chief complaint of difficulty in eating and speaking due to teeth loss. History revealed that he had lost his teeth due to periodontal involvement and had been edentulous for eight years.
On examination it was found that maxillary and mandibular ridges were atrophic. A thorough medical and dental history was elicited from the patient followed by clinical and radiographic examination. Treatment options discussed were pre-prosthetic surgery followed by conventional complete denture, implant-supported prosthesis and conventional complete dentures. Pros and cons of all were explained to the patient. He decided in favour of conventional complete denture prosthesis due to the cost involved and the surgical procedure involved in pre-prosthetic surgery and an implant-supported prosthesis.
Steps for conventional complete denture fabrication were followed up till the try-in stage with the exception of using admix technique at the definitive impression stage and a neutral zone impression technique at the maxillo-mandibular relations stage for the mandibular atrophic ridge [1,2]. During try-in, esthetic and phonetic analysis of the trial dentures demanded an increase in the height of the dentures that in turn would increase the weight of the prosthesis. To reduce the weight of the prosthesis, it was decided to rehabilitate the patient with hollow dentures.
Technique
1. V-shaped notches were made at five sites on the land area of the maxillary cast and the waxed maxillary denture was sealed to the master cast. The maxillary trial denture was duplicated with irreversible hydrocolloid impression material (Tropicalgin, Zhermack, Badia Polesine, Italy) and poured in Type III dental stone (Kalstone, Kalabhai Pvt., Ltd., Mumbai, India) to obtain a working cast.
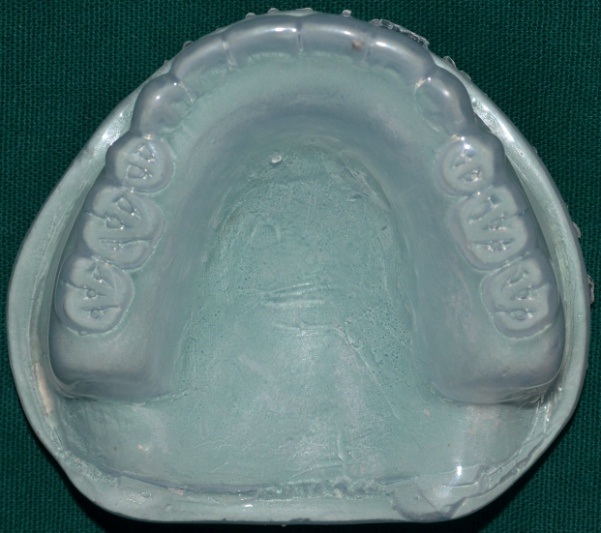
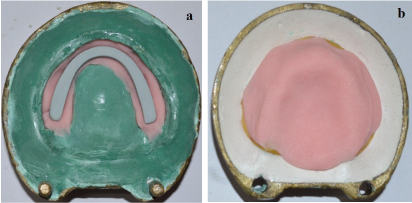
2. A template of 1mm thick BIOPLAST (Scheu Dental GmbH, Iserlohn, Germany) transparent film was then fabricated on this working cast with the help of a BIOSTAR (Scheu Dental GmbH) heat and vacuum press to obtain the trial denture external contours [Table/Fig-1].
A 1mm thick polyethylene sheet pressed on duplicate stone cast of waxed maxillary complete denture.
3. The maxillary trial denture was invested and de-waxed in the conventional manner.
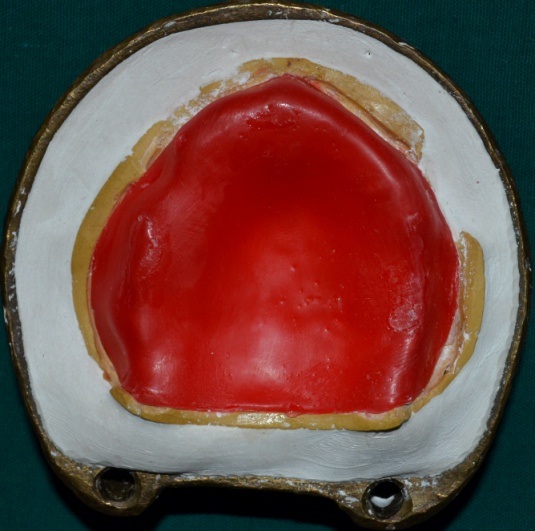
4. Modelling wax (2mm thick) was adapted over the master cast to ensure uniform and adequate thickness of resin all around the planned hollow cavity in the completed denture and subsequently eliminated during a second de-waxing cycle prior to packing [Table/Fig-2].
A 2mm thick modelling wax adapted over the master cast to ensure adequate and uniform resin thickness in the complete denture.
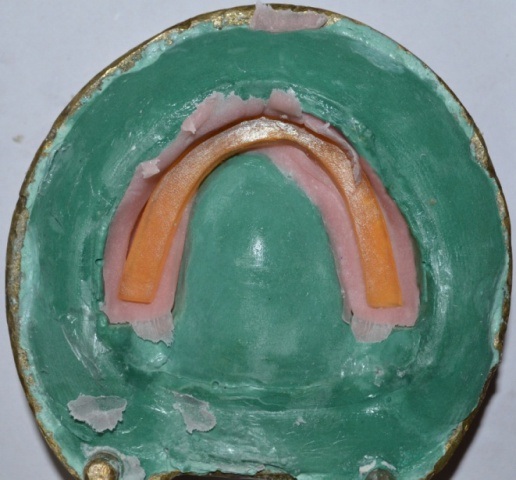
5. For the purpose of achieving the hollow cavity, first a temporary putty spacer (Zeta Plus, Zhermack) was fabricated, adjusted for suitability and used for all the steps of denture fabrication up till the trial closure [Table/Fig-3a].
(a) Temporary putty spacer. (b) Spacer hand carved out of glycerine soap.
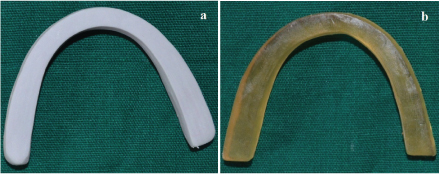
6. A glycerine soap (Pears, Hindustan Unilever Ltd., Mumbai, India) replica of the putty spacer was hand carved using a Le Cron carver (Hu-Friedy, Chicago, IL) for use during the final closure and acrylization [Table/Fig-3b]. The exact replication was ensured by measuring with a Vernier’s calliper.
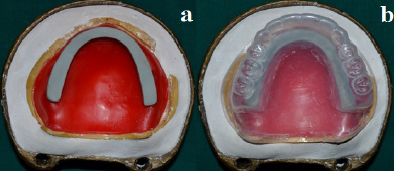
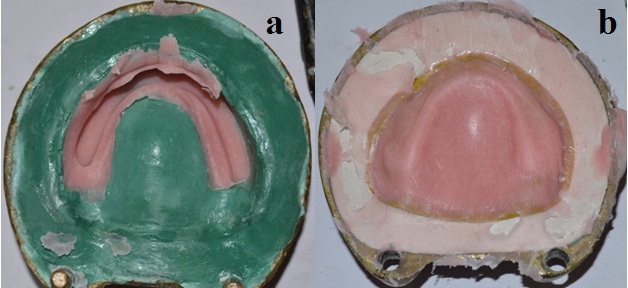
7. The accuracy of the 3D spacer from all aspects was assessed by placing between the master cast (with 2mm modelling wax adapted to it) and the BIOSTAR template [Table/Fig-4a, 4b].
(a) Temporary putty spacer placed over master cast with 2mm thick modelling wax adapted to it. (b) 2mm space left between temporary putty spacer and BIOSTAR template.
8. After this, a trial closure was carried out using the temporary putty spacer [Table/Fig-5a,5b]. The flasks were opened and temporary putty spacer retrieved. The mold space was visually assessed for adequate resin thickness all around the hollow cavity [Table/Fig-6a,6b]. The hollow space left by the temporary putty spacer was now filled with the soap spacer and final closure of the flasks was achieved [Table/Fig-7]. The denture was acrylized in conventional manner.
Trial closure carried out using temporary putty spacer.
Visual assessment of mold space for adequate resin thinckness all around the hollow cavity.
Placement of soap spacer.
9. The denture was retrieved in the usual manner following processing. Using a micromotor handpiece, openings were cut into the denture base distal to the second molar [Table/Fig-8]. The denture was then immersed in a bowl of water to allow dissolution of soap. Also, a cleaning brush was pushed in and out through the openings to aid in mechanical removal of the soap. Water spray was used to flush traces of soap completely. The hollow cavity was air dried, and the openings were sealed using autopolymerizing acrylic resin [Table/Fig-9a].
Removal of soap spacer from the maxillary denture.
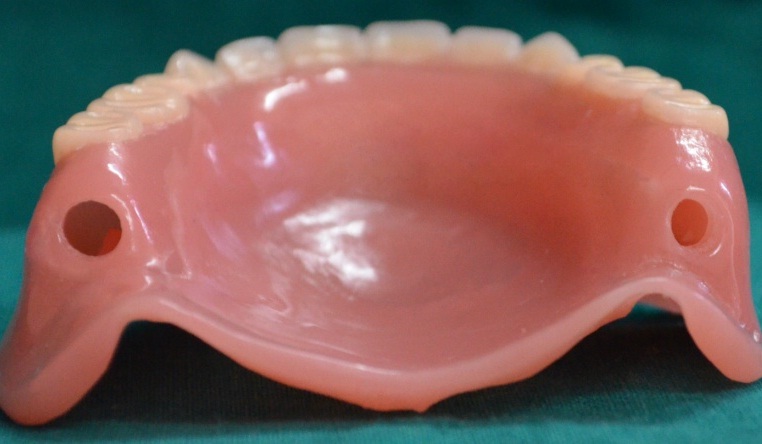
(a) Hollow maxillary complete denture. (b) Hollow denture floating in water.
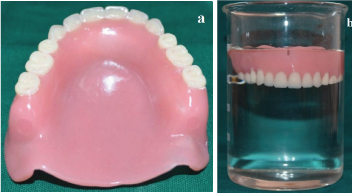
10. The denture was immersed in water overnight and weighed before and after immersion to assess leakage into the cavity. A water test was performed to evaluate the hollow space as evident by the floating denture [Table/Fig-9b].
11. Upper/Lower dentures were then finished, polished, and delivered to the patient. The patient was reviewed after a week, and minor adjustments were made.
Discussion
The goal of prosthodontic treatment is to palliate the anatomical and functional deficiencies resulting from tooth loss. Tooth loss leads to residual ridge resorption which is a complex phenomenon driven by various anatomic, prosthetic, functional and metabolic factors [3,4]. Extreme resorption of either ridge will lead to a reduced denture-bearing area, which in turn will affect retention, stability and support for the complete denture. Excessive ridge resorption also results in a large restorative space between the residual ridges [5]. Prosthetic rehabilitation in such scenarios often results in increased height and weight of the prosthesis, overloading the residual ridges and further compromising the retention and stability of the prosthesis.
Fabrication of hollow dentures has been tried to decrease the weight of the prosthesis which in turn increases the retention and stability [5–7]. Weight reduction approaches have been achieved using a solid three dimensional spacer, including cellophane-wrapped asbestos [8], silicone putty [5,9], light-body coated gauze [10], thermocol [11], dental stone [12], play dough [13] and salt [14] during laboratory processing to exclude denture base material from the planned hollow cavity of the prosthesis. Although successful, the biggest disadvantage of these techniques is the tedious retrieval of the three dimensional spacer especially from the anterior region of the prosthesis between the canines due to the curvature of the arch [11]. The problem encountered while using salt is its inability to sustain pressures produced during flask closure resulting in a failure to achieve a hollow cavity inside the prosthesis. Hence, no substantial difference in weight of the prosthesis can be achieved.
The technique described here uses a soap spacer specifically hand carved out of a glycerine soap bar due to its easy retrievability that can be attributed to a high content of glycerine and other humectants in it, rendering it highly water soluble compared to other soaps. Other advantages of using a glycerine soap spacer are that it can sustain curing temperatures (boiling point of glycerine 290°C) and doesn’t interfere with the polymerization of heat cure acrylic resin or leave any residues inside the hollow cavity [15]. Also because the soap spacer is eventually removed leaving behind a clean hollow cavity, any concern regarding its biocompatibility in the oral cavity is dismissed.
Alternately, fabrication of separate pieces of the prosthesis either individually or around a 3D spacer has also been described followed by joining the individual pieces using autopolymerizing acrylic resin repair techniques [6,16]. The major drawback of such techniques is that a junction is formed between the two previously polymerized portions of the denture which may be at an increased risk of seepage of fluid into the denture cavity. To compound the matters further, this junction is a common site for post insertion adjustments increasing the risk of leakage.
Most authors have used a double flask technique for fabrication of hollow dentures [4–7,10,13,14]. Double flask technique means these techniques utilized a pair of split dental flasks with interchangeable counters where one set of flasks was used to first obtain a permanent record base followed by using a second set of flasks to pack heat cure acrylic resin over the teeth. The accuracy of fit between the base of one flask and the counter of other flask is critical as an inaccurate fit may lead to alteration of vertical dimension. The technique described in this manuscript overcomes this problem by using a single flask for fabrication of hollow denture. Using a single flask technique eliminates the extra steps of investing, packing and acrylization of a permanent record base. Unlike others this technique allows fabrication of maxillary hollow denture as a single unit around the 3D soap spacer which is subsequently removed.
The single flask technique enables the operator to achieve a trial closure with the temporary putty spacer which creates space for the final soap spacer avoiding any extra pressure over it during the final closure. The trial closure also allows the verification of adequate resin thickness all around the spacer or the planned hollow cavity.
This technique incorporates the use of a clear, vacuum formed matrix (BIOSTAR template) of the trial denture external contours along with adaptation of 2mm thickness of modelling wax over the master cast to ensure uniform and adequate thickness of resin all around the planned hollow cavity in the final complete denture.
The small window in the cameo surface distal to the second molar allows recovery of three dimensional spacer in an area that is not commonly adjusted after denture insertion and has only a small margin along which leakage could occur.
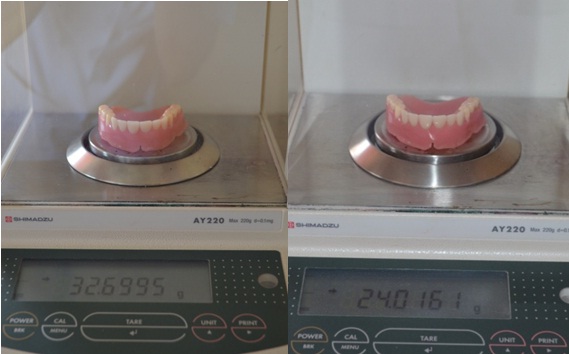
Finished and polished maxillary denture was duplicated into a solid prosthesis to determine the difference in weight if it had not been hollowed. The difference in weight was 8.6 grams [Table/Fig-10].
Difference in the weight of conventional and hollow maxillary complete denture.
Conclusion
This technique overcomes the disadvantages of the older techniques. The glycerine soap spacer has the advantages of easy retrievability, ease of carving and it doesn’t adhere to acrylic resin. The single flask technique eliminates the requirement of two identical flasks and the extra step of fabrication of a permanent record base. Hence, it’s a simple, economical, time-saving and a predictable technique.
Pre-prosthetic surgeries and implant-retained prosthesis may not be possible in all cases due to systemic diseases or cost. In such cases, a lightweight complete denture is a logical alternative to counteract the lateral forces better and decrease leverage by reducing extra loads on underlying tissues.
[1]. McCord JF, Tyson KW, A conservative prosthodontic option for the treatment of edentulous patients with atrophic (flat) mandibular ridgesBr Dent J 1997 182:469-72. [Google Scholar]
[2]. Gahan MJ, Walmsley AD, The neutral zone impression revisitedBr Dent J 2005 199:269-72. [Google Scholar]
[3]. Jahangiri L, Devlin H, Ting K, Nishimura I, Current perspectives in residual ridge remodelling and its clinical implications: a reviewJ Prosthet Dent 1998 80:224-37. [Google Scholar]
[4]. Manoj SS, Chitre V, Aras MA, Management of compromised ridges: a case reportJ Indian Prosthodont Soc 2011 11:125-29. [Google Scholar]
[5]. O’Sullivan M, Hansen N, Cronin RJ, Cagna DR, The hollow maxillary complete denture: A modified techniqueJ Prosthet Dent 2004 91:591-94. [Google Scholar]
[6]. Fattore LD, Fine L, Edmonds DC, The hollow denture: an alternative treatment for atrophic maxillaeJ Prosthet Dent 1988 59:514-16. [Google Scholar]
[7]. Radke U, Mundhe D, Hollow maxillary complete dentureJ Indian Prosthodont Soc 2011 11:246-49. [Google Scholar]
[8]. Worley JL, Kniejski ME, A method for controlling the thickness of hollow obturator prosthesesJ Prosthet Dent 1983 50:227-29. [Google Scholar]
[9]. Gardner LK, Parr GR, Rahn AO, Simplified technique for the fabrication of a hollow obturator prosthesis using vinyl polysiloxaneJ Prosthet Dent 1991 66:60-62. [Google Scholar]
[10]. Caculo SP, Aras MA, Chitre V, hollow dentures: treatment option for atrophic ridges. a clinical reportJournal of Prosthodontics 2013 22:217-22. [Google Scholar]
[11]. Shetty V, Gali S, Ravindran S, Light weight maxillary complete denture: a case report using a simplified technique with thermocolJ Interdiscip Dentistry 2011 1:45-48. [Google Scholar]
[12]. Chalian VA, Barnett MO, A new technique for constructing a one-piece hollow obturator after partial maxillectomyJ Prosthet Dent 1972 28:448-53. [Google Scholar]
[13]. Gundawar S, Zamad A, Gundawar S, Light weight dentures: An innovative techniqueContemp Clin Dent 2014 1:134-37. [Google Scholar]
[14]. Aggarwal H, Jurel SK, Singh RD, Chand P, Kumar P, Lost salt technique for severely resorbed alveolar ridges: An innovative approachContemp Clin Dent 2012 3:352-55. [Google Scholar]
[15]. http://www.aciscience.org/docs/glycerine_-_an_overview.pdf [Google Scholar]
[16]. Holt RA Jr, A hollow complete lower dentureJ Prosthet Dent 1981 45:452-54. [Google Scholar]